Pages

Saturday, June 27, 2015

Creativity and Accomplishments


I need to be creative.

When we first moved to Memphis, the man whom we bought the house from was very generous and left us most of his possessions in our house for a reasonable fee.  I did not realize exactly how much he would leave, and it has been such a fun adventure coming up with a blend of our style and his things.  I feel like I have been given such a blessing with our new home.


Over the last few months I have learned that I am quite happy when I can accomplish what I have envisioned in my head for a space.  Accomplishing tasks gives my brain a slow upswing of a neurotransmitter called dopamine and helps me be a better mama.  So there you have it.  Decorate because it will make you a better mom :)


All kidding aside, it is important to find what gives you a sense of creativity and accomplishment.  Those who are familiar with TBRI(R) know that giving "yeses" to their children builds trust, but it also builds confidence in them.  Our children long to be creative and complete the tasks that are in their little minds.

For example, today I said "yes" to this little one totally overhauling her room.  She asked if she could "decorate some tents".  I said, "Yes," knowing it could end up just like this where all the things are moved all around!  She said she made her room into a "whole bunch of bedrooms" fully decorated and complete with their own family photos ;)
I see someone peeking :)
A while back, I posted this pic on Instagram to show that I really do believe in saying, "Yes" to our kids, especially when it involves something creative- in any form.  We often go out like this in public.  In fact, tonight we left our house in an Egyptian get-up, a ballerina dress, and another mis-matched outfit!

Today, it was easy to say "Yes" because I was also saying "Yes" to myself.  Creating and accomplishing fun things.  Saying "yes" to our children doesn't need to mean always saying "no" to ourselves.  My MO, however, is usually "No".  When asked a question, I think "No!" automatically 97% of the time!  I think of all the things that will happen if I say yes to this or that and then I get overwhelmed and want to squash anything before it can get out of control.  I noticed today that while I was building this awesome dream of a bathroom space, I had more mental space to give them some freedom.  I said "Yes" to a lot of things today!  I think there is something to that.  If we are taking care of ourselves, doing what we need to do for us, then the yeses come easier.

I love our work-in-progress home and I love our creative children!  And because some of you may be wondering how we did this in our bathroom, here are some notes :)


how we did the wood wall

  • We are not DIY experts.  You can find a lot of wood pallet inspiration with great instructions like this one on Pinterest or the Internet.
  • We did ours for about $100 because I made the stain myself and we just paid for the cost of the wood plus spray-on polyurethane.   
  • We bought knotty pine shiplap from Home Depot at less than $10 per 12 foot long board (8" high).  We bought 10 boards total and had Home Depot cut them all in half for easier staining and handling (less work in the long run for us too ;).
  • We painted the bathroom cabinets with Porpoise by Sherwin Williams and they had a bogo sample sale at Lowe's (which SW paint at Lowe's is actually almost a quart sized-sample), so the paint for the cabinets only cost $2.50!  
  • I had leftovers so I brewed strong coffee (about four pots worth of espresso brew for the whole wall's worth of wood- I use a French coffee press) and added a Tbsp or so of the leftover SW Porpoise paint to each pot's worth of coffee and stained all the wood.  I did two coats of this.  Pinterest is full of coffee-staining tips and different ways to use coffee to stain wood; however, most of them involve waiting and I did not have the patience to wait for anything for 24 hours.  I also found that this process is very forgiving since you don't want all your "weathered" wood to look the same.  I was going for a rustic barn-wood feel.  
  • All-in-all from staining to sealing, it probably could be done in one day, waiting between coats to dry.  Because I have children and procrastinate and had all this wood to finish, it took me a bit longer :)  This has been a work in progress!  I did use Minwax spray on poly in a Satin finish to seal the wood since it will be in our bathroom.  I liked the satin finish because it seemed to not change the color or the feel of the weathered wood look.
  • Progress.  Notice the chunks the previous mirror took out of the wall when taken down!  So glad to put wood over that!
  • After all that, it's just measuring, cutting, and nail-gunning (David's favorite part!).  
  • Make sure to nail-gun into the studs.  And because it is shiplap, there is no need for spacers when the wood expands (above and below); however, we did leave 1/16" space between the two perpendicular walls and the space between planks that are parallel to those walls (perpendicular lines to the floor- space left-to-right).
The before and afters for good measure :)


Tuesday, June 16, 2015

Vegan Ranch Dressing


My kids say this tastes better than Ranch.  I'm not sure, however, that they have actually ever had the traditional dairy version of the Southern dressing :).  But I will take the compliment!

We use this one on salads or for dipping sauces for home-made chicken nuggets or veggies.  Super quick and easy, and free of dairy, eggs, gluten, nuts, and most allergens.  Win!

Dressing

Ingredients

  • 1 cup Veganaise (we use the soy-free version)
  • 1/4 cup pickle juice (that's right, pickle juice- trust me!)  I love Bubbies cultured bread and butter chips
  • 1/8 tsp. garlic powder or 1/4 tsp minced fresh garlic clove
  • 1/4 tsp dried dill
  • 1 tsp dry Italian seasoning (or blend of rosemary, oregano, marjoram, basil)
  • salt and pepper to taste
  • 1-3 Tbsp water, if needed

Method

  • Mix all ingredients in a blender until combined.  
  • If using it for a salad dressing add 2-3 additional Tbs water to thin it out to desired consistency.  You may not want to add any water, or just a little, if you are using as a dipping sauce.
  • Enjoy and watch your kiddos eat their raw veggies!

Saturday, June 13, 2015

Watermelon Summer Recipes


Well, we have officially been living in Memphis for over a month now.  Can't believe it!  Also, still have not gotten back in the full swing of cooking most meals for the family at home.  We are still doing much better here than in the last few months of house showings and moving a few states away.

Have any of you ever moved before?  It is heinous!  If I ever judged how much someone complained when selling, moving, and buying their home I repent in sack-cloth and ashes!  It was one of the hardest things I have done, and I feel like my "hardest things" repertoire is quite extensive!


So in the vein of not wanting to use my brain to think of new food, I went back and took a look at some old recipes to jazz up a bit.  I have several classic watermelon summertime recipes, and I have included two here along with their new spins.  I love adding raw recipes in any way I can these days and these definitely do the trick.  And easy- also very easy.  That is my criteria for recipe making these days!

Red, White, and Blueberry Watermelon Salad (gfcf, raw, vegan, paleo-friendly)

The original recipe calls for 1/4 cup fresh mint, however, later in the summer my mint seems to not be up for all the growing!  If you have fresh mint in your garden it's nice to add a few leaves, chopped up.  However, I have revamped this using Young Living essential oils and the taste it much fresher!

Ingredients

  • watermelon cubed, about 12 cups (from a 7 or 8 pound watermelon weighed with rind on)
  • 2 cups fresh blueberries
  • 2 drops YL Peppermint essential oil**
  • 3 drops YL Jade Lemon essential oil* (can substitute 1 Tbsp lemon or lime juice)

Method

  • Cube the watermelon, and be sure to pour in the extra juice if it's a juicy melon!
  • Finely chop the mint leaves.
  • Toss mint and watermelon with the blueberries and lemon juice in large bowl.
  • Serve immediately or let sit for a while so the flavors meld together better.
  • This can be stored in the refrigerator for up to 6 days.
** Note:  I don't recommend adding more than 2 drops for the whole recipe as Peppermint is a "hot oil" and can feel warm to the skin.  There is no fat in this recipe to cut the peppermint with so 1-2 drops is plenty.  If you or your kids eat on the messy side like mine and they drip some, 2 drops should still be just fine:)  

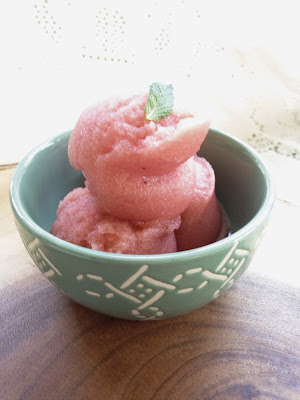
Bubblegum Ice cream (gfcf, raw, vegan, paleo-friendly) 

The original recipe here was also super easy.  But if you want to skip the freezing-before steps, or you don't have a high powered blender, just blend room temp and then process in your ice cream maker.  My kids absolutely love this recipe.  It is their hands-down favorite "ice cream" I make (more of a sorbet really) ;) 

Ingredients 

  • 2 frozen ripe bananas
  • 3 cups watermelon, chopped into chunks, de-seeded and frozen (if using seedless the white seeds are fine)
  • 2-4 drops YL Spearmint (not peppermint) essential oil*

Method 

  • The night before, freeze the watermelon and bananas- chopping them into chunks first for easier processing.
  • When ready to eat the ice cream, simply put all ingredients into a high powered blender (I use Vitamix) and puree. (This will also work in a food processor- but will have to process with the s-blade in 2-3 batches)
  • If not freezing, just blend all ingredients in a blender and process according to your ice cream maker directions.
  • Serve immediately
My two photo-shoot helpers enjoying the rewards of their hard work ;)


*All recipes using essential oils on this blog are specific to Young Living essential oils only.  I cannot give recommendations and suggestions on any oils but Young Living's essential oils.  The statements made on this blog about Young Living Essential Oils have not been evaluated by the FDA.  These products and information are not intended to diagnose, treat, cure, or prevent any disease.  Anyone pregnant, nursing, or suffering from disease or injury should consult with a physician.  If you are currently on medication, please do not stop.  It's always good to do your own research.  I have done mine for my family and we chose to incorporate YL essential oils into our lives.  If you are wanting to follow and do the same, please visit here for more information. 

Tuesday, June 2, 2015

Homemade GF Bread and Shabbat


Friday we had our first Shabbat in our new home.  After several months of craziness, moving, unpacking, getting used to so much newness; a time of togetherness was greatly needed!

No, we are not of Jewish descent and we do not practice this every week, but we cherish this tradition and try to do it on Fridays when we can.  We started it a few years back when I read a book encouraging The Simplifying and Slowing Down of Things.

I light the two candles, the children each have a small part they have memorized and Daddy shares something or just prays, we break bread, and we share a time of communion.  Sometimes we give verbal blessings to our children, sometimes we laugh and are silly, and usually we each share something good and bad about our day or week.  This is a game we call "High-Low"; however, it has digressed into "Good-High-Low and Sad-Low" or "High-Low, Middle-Low, Low-Low...."  But we don't mind because it means our kiddos are loving sharing with us and they know this sacred time is a time where we all listen to one another, everyone is heard, and we eat a slow, healthy meal together late (for them!) into the night.

If you want to learn more about Shabbat practices, there are many places on the internet that give suggestions of what to do, say, and eat.  We have made it our own in a way we can best remember what is important and focus on each other and, of course, on Jesus who has been with us, healed us, and brought us through so much.  I highly recommend it for people like myself who need a forced slow-down at the end of the week to restart as a family!

I think the bread at Shabbat may be a highlight for my children because they know it will be hot from the oven and will "melt the butter"!  This one was a favorite of my recipes so far (usually I throw some ingredients together and it doesn't quite turn out the way I like, but this time it did so I wrote it down:) and I thought I would share with you all.  Enjoy!

Homemade GF (and vegan) Yeast Bread

Ingredients


  • 1 cup warm water (100-110 degrees)
  • 2 tsp active dry yeast
  • 1/3 cup plus 1 tsp coconut sugar (will use the 1 tsp with the yeast)
  • 4 cups GF All Purpose Blend (I use Bob's Red Mill's 1-to-1 Baking Blend), plus extra if needed
  • 1/2 cup Arrowroot or Potato Starch
  • 1 1/2 Tbsp Psyllium Husk Powder (this helps the bread can be found at local health food co-ops or Whole Foods or online)
  • 2 tsp sea salt
  • 1/4 cup melted Coconut Oil 
  • 1 additional cup of water
  • 3-4 cups Ice Water in a pitcher

Method


  • Preheat oven to 375 degrees F and place a pan (big enough and with a lip that can hold the ice water later) in the bottom rack of your oven.
  • Combine warm water and sugar and sprinkle the yeast over to bloom the yeast.  Let sit until you see bubbles forming- about 10 minutes. 
  • Meanwhile, stir and combine remaining dry ingredients: GF All Purpose flour, Starch, 1/3 cup coconut sugar, psyllium, and sea salt).
  • When yeast is ready pour into dry mixture.  ADD 1 more cup of water and the oil.  Stir to combine, careful to not overstir- you don't need to kneed like glutenous breads.
  • Add more water or flour if needed.  The mixture should be easily scraped from the side of the bowl, but still very wet.  It will also absorb some of the liquid as it rises.
  • Cover the bowl with a wet cloth or seal and let rise in a warm area for about thirty minutes or until close to double in size.  
  • Then re-stir back down to original size and shape into a rounded shape on a bread pan or stone.  The best thing to do here is cover with the mixing bowl (or larger bowl) for the final rise.  Just flip it over the bread round.
  • Let rise 20 minutes or so until doubled again.
  • Open oven and pour the ice water into the now hot pan in the bottom of oven.  This will create steam while the bread baked and really develop a nice crust (hard to get in most gluten-free breads!).
  • Gently place the bread pan with the round, now doubled in size, in the middle rack of oven and bake at 375 for 30-45 minutes.
  • This will keep a few days covered on counter-top, but I will sometimes freeze half if I know we aren't going to get to it all at once.  Alternatively, you can use a loaf pan for sandwiches; however, add extra baking time.


Powered by Blogger.
 
Blogger Template By Designer Blogs