 |
When we first moved to Memphis, the man whom we bought the house from was very generous and left us most of his possessions in our house for a reasonable fee. I did not realize exactly how much he would leave, and it has been such a fun adventure coming up with a blend of our style and his things. I feel like I have been given such a blessing with our new home.
 |
All kidding aside, it is important to find what gives you a sense of creativity and accomplishment. Those who are familiar with TBRI(R) know that giving "yeses" to their children builds trust, but it also builds confidence in them. Our children long to be creative and complete the tasks that are in their little minds.
For example, today I said "yes" to this little one totally overhauling her room. She asked if she could "decorate some tents". I said, "Yes," knowing it could end up just like this where all the things are moved all around! She said she made her room into a "whole bunch of bedrooms" fully decorated and complete with their own family photos ;)
 |
| I see someone peeking :) |
A while back, I posted this pic on Instagram to show that I really do believe in saying, "Yes" to our kids, especially when it involves something creative- in any form. We often go out like this in public. In fact, tonight we left our house in an Egyptian get-up, a ballerina dress, and another mis-matched outfit!
Today, it was easy to say "Yes" because I was also saying "Yes" to myself. Creating and accomplishing fun things. Saying "yes" to our children doesn't need to mean always saying "no" to ourselves. My MO, however, is usually "No". When asked a question, I think "No!" automatically 97% of the time! I think of all the things that will happen if I say yes to this or that and then I get overwhelmed and want to squash anything before it can get out of control. I noticed today that while I was building this awesome dream of a bathroom space, I had more mental space to give them some freedom. I said "Yes" to a lot of things today! I think there is something to that. If we are taking care of ourselves, doing what we need to do for us, then the yeses come easier.
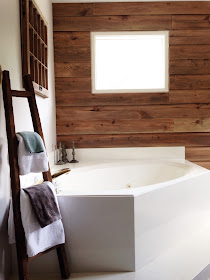
I love our work-in-progress home and I love our creative children! And because some of you may be wondering how we did this in our bathroom, here are some notes :)
how we did the wood wall
- We are not DIY experts. You can find a lot of wood pallet inspiration with great instructions like this one on Pinterest or the Internet.
- We did ours for about $100 because I made the stain myself and we just paid for the cost of the wood plus spray-on polyurethane.
- We bought knotty pine shiplap from Home Depot at less than $10 per 12 foot long board (8" high). We bought 10 boards total and had Home Depot cut them all in half for easier staining and handling (less work in the long run for us too ;).
- We painted the bathroom cabinets with Porpoise by Sherwin Williams and they had a bogo sample sale at Lowe's (which SW paint at Lowe's is actually almost a quart sized-sample), so the paint for the cabinets only cost $2.50!
- I had leftovers so I brewed strong coffee (about four pots worth of espresso brew for the whole wall's worth of wood- I use a French coffee press) and added a Tbsp or so of the leftover SW Porpoise paint to each pot's worth of coffee and stained all the wood. I did two coats of this. Pinterest is full of coffee-staining tips and different ways to use coffee to stain wood; however, most of them involve waiting and I did not have the patience to wait for anything for 24 hours. I also found that this process is very forgiving since you don't want all your "weathered" wood to look the same. I was going for a rustic barn-wood feel.
- All-in-all from staining to sealing, it probably could be done in one day, waiting between coats to dry. Because I have children and procrastinate and had all this wood to finish, it took me a bit longer :) This has been a work in progress! I did use Minwax spray on poly in a Satin finish to seal the wood since it will be in our bathroom. I liked the satin finish because it seemed to not change the color or the feel of the weathered wood look.

Progress. Notice the chunks the previous mirror took out of the wall when taken down! So glad to put wood over that! - After all that, it's just measuring, cutting, and nail-gunning (David's favorite part!).
- Make sure to nail-gun into the studs. And because it is shiplap, there is no need for spacers when the wood expands (above and below); however, we did leave 1/16" space between the two perpendicular walls and the space between planks that are parallel to those walls (perpendicular lines to the floor- space left-to-right).


Such a big difference! I would love your creativity if we buy an older house down the road - this looks amazing!
ReplyDelete